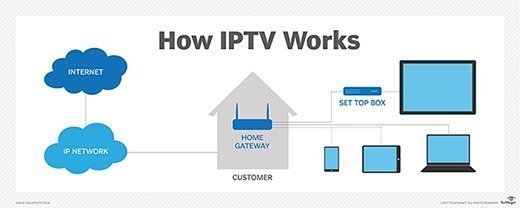
Setting up a home IPTV network can transform your viewing experience, providing access to a plethora of channels and on-demand content with high-quality streaming. This guide will walk you through the steps How to Set Up a Home IPTV Network, ensuring a seamless and enjoyable viewing experience.
How to Set Up a Home IPTV Network
Understanding IPTV
IPTV (Internet Protocol Television) delivers television content over the internet, allowing you to stream live TV channels, movies, series, and on-demand content. Unlike traditional cable or satellite TV, IPTV uses your internet connection, offering greater flexibility and a wider range of content.
Benefits of a Home IPTV Network
- Cost-Effective: IPTV can be more affordable than traditional TV services, offering various subscription plans to suit your budget.
- Flexibility: Watch your favorite content on multiple devices, including smart TVs, smartphones, tablets, and laptops.
- Variety: Access a vast library of channels and on-demand content from around the world.
- High-Quality Streaming: Enjoy high-definition (HD) or even 4K streaming, providing a superior viewing experience.
Requirements for Setting Up a Home IPTV Network
Before diving into the setup process, ensure you have the following:
- High-Speed Internet Connection: A stable and fast internet connection is crucial for uninterrupted streaming. Aim for at least 10 Mbps for HD content and 25 Mbps for 4K streaming.
- IPTV Subscription: Choose a reputable IPTV service provider that offers the channels and content you desire.
- Compatible Devices: You’ll need devices like smart TVs, streaming boxes (e.g., Amazon Fire Stick, Roku), smartphones, tablets, or a computer.
- Router: A good quality router to ensure a stable internet connection throughout your home.
Step-by-Step Guide to Setting Up Your Home IPTV Network
Step 1: Choose an IPTV Service Provider
Selecting the right IPTV service provider is the first step. Look for providers with good reviews, a wide range of channels, and reliable customer support. Some popular IPTV providers include:
- IPTVSMARTER+: Known for its extensive channel list and user-friendly interface.
- IPTV Subscription: Offers a variety of plans tailored to different needs.
- Helix IPTV: Provides high-quality streaming and a broad selection of content.
Step 2: Subscribe to a Plan
Once you’ve chosen a provider, subscribe to a plan that suits your needs. Plans usually vary based on the number of channels, streaming quality, and additional features like on-demand content.
Step 3: Install the IPTV App
Most IPTV providers offer their own apps, which you’ll need to download and install on your device. Here’s how to install the app on different devices:
Smart TV
- Open the app store on your smart TV (e.g., Google Play Store for Android TVs).
- Search for the IPTV app provided by your IPTV service.
- Download and install the app.
- Open the app and enter your subscription details to start streaming.
Streaming Devices (e.g., Fire Stick, Roku)
- Go to the app store on your streaming device.
- Search for the IPTV app.
- Download and install the app.
- Open the app and enter your subscription details.
Smartphones and Tablets
- Open the Google Play Store or Apple App Store.
- Search for the IPTV app.
- Download and install the app.
- Open the app and enter your subscription details.
Computers
- Visit the IPTV provider’s website.
- Download the app for Windows or Mac.
- Install the app and open it.
- Enter your subscription details.
Step 4: Configure Your IPTV App
After installing the app, you’ll need to configure it with your IPTV subscription details. This usually involves entering your username, password, and sometimes an M3U playlist URL provided by your IPTV service.
Step 5: Optimize Your Network
To ensure a smooth streaming experience, optimize your home network:
- Position Your Router: Place your router in a central location to ensure a strong Wi-Fi signal throughout your home.
- Use Ethernet: For the best streaming quality, connect your devices directly to the router using Ethernet cables.
- Upgrade Your Router: If your router is outdated, consider upgrading to a newer model that supports higher speeds and better connectivity.
Step 6: Start Streaming
Once everything is set up, you can start enjoying your IPTV service. Browse through the channels, explore on-demand content, and enjoy high-quality streaming from the comfort of your home.
Troubleshooting Common Issues
Even with the best setup, you might encounter some common issues. Here’s how to troubleshoot them:
- Buffering Issues: Ensure your internet speed meets the requirements. If buffering persists, try reducing the streaming quality or using an Ethernet connection.
- App Crashes: Update your IPTV app to the latest version or reinstall it.
- Login Problems: Double-check your subscription details and ensure your account is active.
Conclusion
Setting up a home IPTV network is a straightforward process that offers numerous benefits, from cost savings to a vast selection of content. By following this guide, you can enjoy a seamless IPTV experience and stay connected with your favorite shows, movies, and channels. Explore the services of IPTVSMARTER+ to get started on your IPTV journey today!


